Wednesday, October 20, 2010
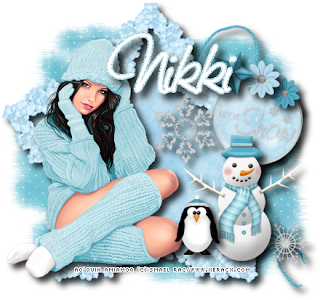
 This tutorial is of my own creation and any resemblance to any other tuts is purely coincidental. This tutorial is for personal use only, using it for monetary gain is against our TOU's.
Supplies Needed:
~Gimp (any version will do).
~Tube of choice. I used the awesome artwork of Ismael Rac, you must have a license to use his art which you can get HERE.
~Winter Wonderland PTU scrapkit which you can get from Creative Intentionz HERE.
~Mask of choice. I used WSL mask223 which you can get HERE.
~Font of choice. I used Saginaw.
Let's get started!!!!!
1. Open a new layer ( I prefer a large canvas, so I make mine 1050x656). Make your canvas transparent (Layer > Transparency > Color to alpha).
2. Open SnowFrame 3, add drop shadow (Filters > Light & Shadow > Drop Shadow).
3. Open Paper 12 center it behind the frame, remove excess paper using a cutting tool or eraser.
4. Open your tube, add drop shadow.
5. Open and place the following elements:
String 1
SnowFlake 1
SnowFlake 2
Brad 3
Flower 1
Flower 3
Star 1
SnowMan 1
Penguin 1
~Some elements may need to be sized down. Using the Scale Tool in your tool box adjust pixels to desired size~
~Add drop shadow to all elements~
6. Open Paper 7.
7. Open mask.
8. Add mask to paper (right click on paper layer in layer box > Add Layer Mask > Black Full Transparency).
~Select mask in layer box, right click on mask (on canvas) > copy.
~Make mask layer invisible (click on eye next to mask in layer box).
~Select paper in layer box, right click on paper (on canvas, all you will see is the outline of the paper) > Paste.
~Anchor layer (click on anchor next to trash can on layer box).
~Right click on paper layer (in layer box) > Apply Layer Mask.
~Delete mask layer from layer box.
9. Merge layers (Image > Merge Visible Layer).
10. Crop image (Image > Autocrop Image).
11. Scale image to desired size (Image > Scale Image).
12. Add copyright info and name.
13. Save as .png
You are finished :)
Labels:PTU tuts
Subscribe to:
Post Comments
(Atom)
Labels
12x12 Layout
A Taggers Scrap
Animated
Announcements
Art of Freya
Basic tuts
Blog Trains
CDO
Cluster Frame
CT tags
Extras
Forum Set
Freebies
FTU CU
FTU Kits
FTU tuts
Holiday
Jackie's Jewels
Kissing Kate
Masks
PTU Kits
PTU tuts
Quick Pages
Results
Results with Amys kits
Show Offs
Sweet Cravings Scraps
Tasha's Playground
Templates
Timeline Banners
Chit Chat
Blog Archive
-
▼
2010
(101)
-
▼
October
(14)
- New PTU tut "Crazy Bitch"
- New tut- Friends
- New PTU tut "Friendship"
- New PTU tut "Fallen Angel"
- New PTU tut "Let it Snow"
- New tut- Simple text
- New Tut- Autumn Splendor
- New PTU tut "Autumn Beauty"
- Halloween Masks
- New PTU tut "Believe"
- New Tut- BCA Awareness
- Announcement!
- New PTU tut "Strangers in the Night"
- New PTU tut "Pink Ribbon"
-
▼
October
(14)


0 comments:
Post a Comment